
Exploring the Exposure Triangle
For people new to photography and those starting to explore shutter speed, aperture, and ISO in manual mode, it can feel a bit confusing at first. You tweak one setting, and suddenly your image is too dark, too bright, or just doesn’t look how you expected. That’s because all three are connected, and changing one, almost always affects the others.
This is where the exposure triangle comes into play.
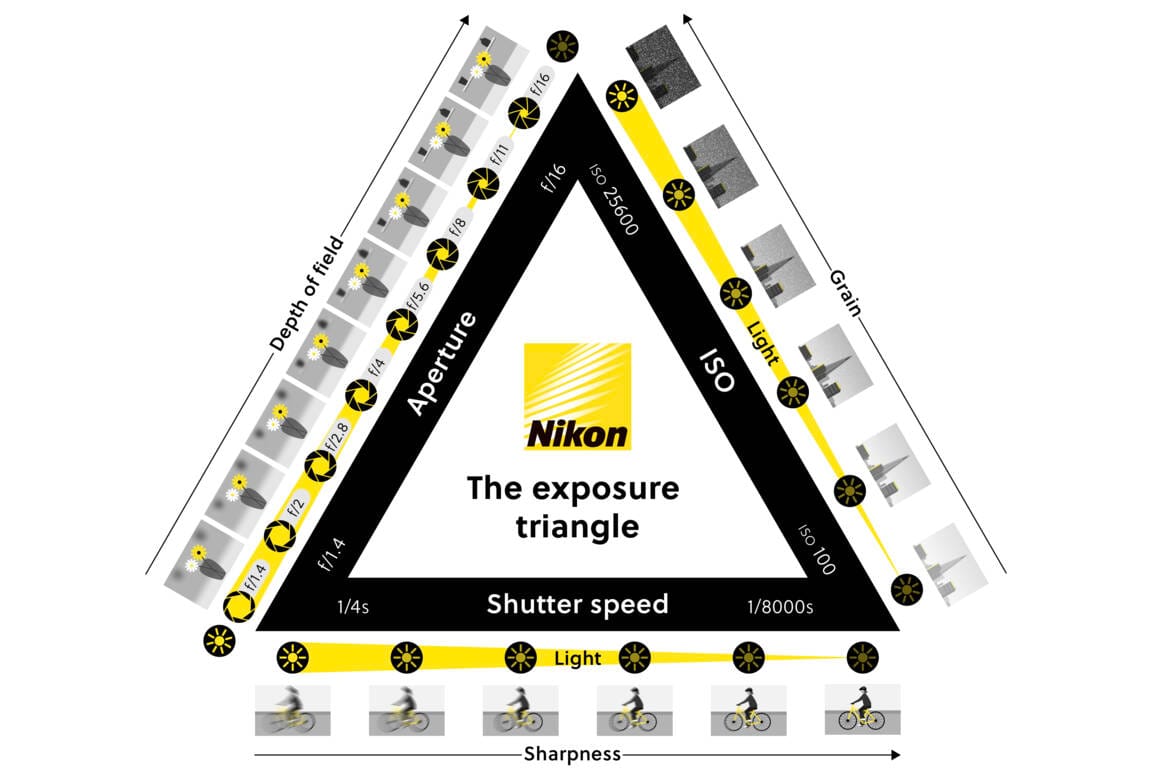
It's a simple, visual way of understanding how those three settings can work together, and control how your photo is exposed.
Each corner represents a setting (Shutter Speed, Aperture, and ISO). It's not about remembering the numbers and technicalities straight away, more about learning how they affect each other when taking a photo.
When you start to recognise that connection, it becomes a lot easier to transition away from automatic modes, and start making choice on how you want your image to look and feel (for example, dark and moody, with motion blur...)
To make it easier, look at each part of the triangle first, then see how they interact with each other.
Shutter Speed is essentially how long the camera's sensor is exposed to to light (like the blink of an eye). A faster shutter speed (e.g. 1/800) helps to freeze movement (although producing a darker image), whilst a slower one (e.g. 1/20) lets in more light allowing for motion blur, light painting, or a lighter image.
Aperture is the opening inside of the lens, controlling how much light enters the camera. It's measured in a unit called f-stops, and it actually sounds a bit backwards at first, as a wider aperture has a lower number (e.g. f/2 or f/5.6), which lets in more light, creating a shallow depth of field, producing those soft blurry backgrounds, whereas a smaller aperture with a higher number (e.g. f/11 or f/22) lets in less light but keep more of the scene in focus, giving you a deeper depth of field which can make the background appear more sharp.
ISO is the camera's sensitivity to light. A lower ISO keeps your image clean and sharp (but darker), whilst increasing it can help in darker environments (making the photo lighter) but introducing noise or grain into the image at a certain level.
On their own, each setting is simple enough but balancing them is the real skill. For example, if you need to increase shutter speed to capture a fast moving subject, you may need to either widen the aperture or increase ISO to keep the image properly exposed.
Thats what the exposure triangle is really for, finding balance between those core elements, dependant on the desired look and feel you want in the image.
Thanks for reading,
Adlai 😄
Happy shooting! Feel free to contact me if you have any questions, and sign up to the newsletter to be notified of new posts.